At PayFit, Product teams are divided into tribes and squads (comparable to the Spotify model). While each of them strives to be autonomous, they are backed up by the developer experience (DevXP) team.
The DevXP team provides a variety of tools to help the engineering teams set up, build and run their application locally, test it on an isolated environment created on demand, and share their documentation on a developer portal.
In our case, in the Time & Payment tribe, we are two squads working together on the Time vertical, building the most amazing time experience for the company. To do it, we chose to apply the Domain-Driven Design (DDD for short) approach to our product because we had some previous trials using it and we knew that it is a great way to solve complex problems and build a quality product.
To help us put DDD into practice, we worked in parallel with the DevXP team in order to improve our developer experience while applying that approach. Our idea was to bootstrap and test some new methodologies and tools to adapt and complete our experience, and in case of success, to share it with the rest of the company. This is a sort of “diverge and converge” process, which is a great way to frame problems differently, and try out new ideas without distraction at our own pace.
This article is not to advocate a specific tool and framework, but rather to use them as an example and present some concepts. The overall idea is to work efficiently as a team with a coherent ecosystem and work culture to deliver with quality and velocity.
Our DDD Journey
Domain-Driven Design is a set of concepts and tools to solve complexity in software development. Said another way, if you need to build some complex software, you can rely on both strategic and tactical solutions provided by DDD to make the problem and solution spaces clearer to everyone.
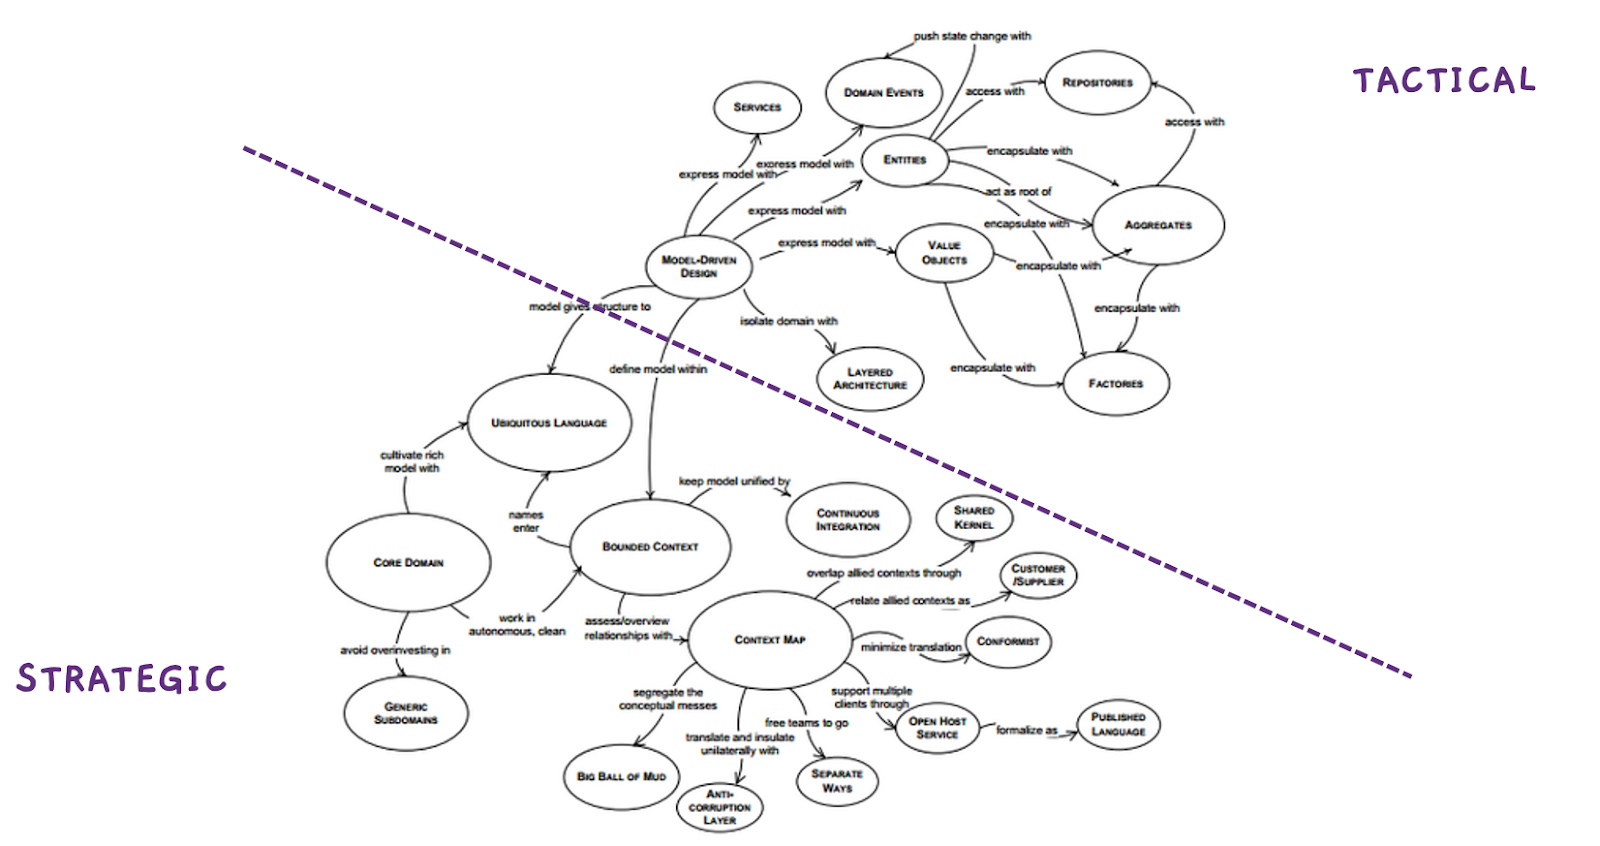
It encourages you to group all the persons working together (or not), in order to build shared knowledge, and to define and use a ubiquitous language you can later easily transpose into code.
A few months ago, we ran a bunch of DDD workshops to (re)discover our Time domain and to divide it into bounded contexts.
The strategic concept of DDD
We gathered everyone — not just our team, but also the domain experts (composed of product managers, designers, product builders, etc.). Together we drafted the system we wanted to build over a virtual Miro board.
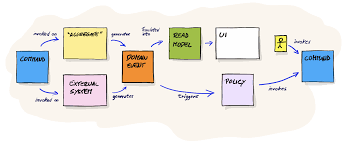
We did an Event Storming workshop where we pointed out all the events occurring on the system, defined the actors (human, service, etc.), the triggers (commands), the business rules, etc.
Then, we zoomed out and checked the result to get the big picture. We were able to identify and isolate each part of the system and define our bounded contexts -- the boundaries within our domain where a particular domain model applies.
We categorised these bounded contexts as “Core”, “Supporting” or “Generic”.
Finally, we drew the context map and canvas to specify how they should interact with each other and each of the business rules.
The following map is an example. We had to do it many times, but once you complete this step, you are in a good position because it means that you have a better understanding of your domain, and are able to think of it as building blocks. Now you know where you should put your efforts.

Turning DDD artefacts into code
Having bounded contexts allows us to define the area of code where we want a clear separation of concerns: each context having its own role to play.
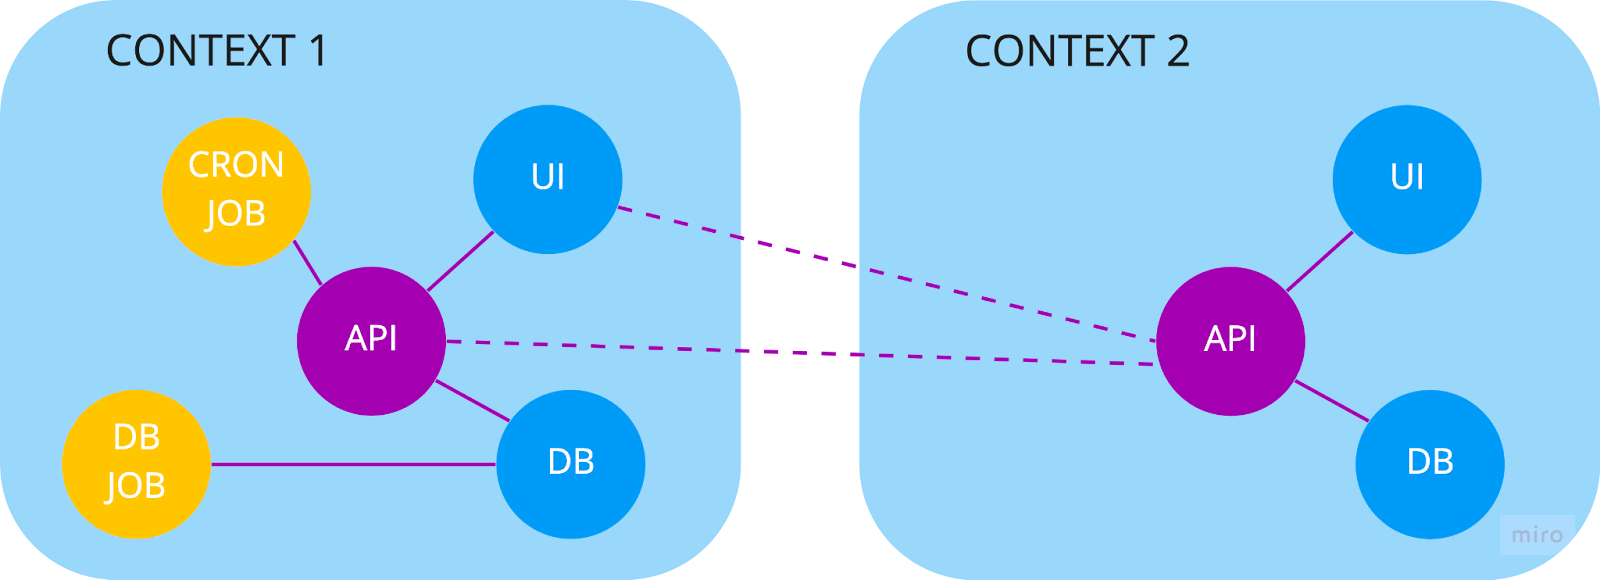
At PayFit, we choose to use a microservice architecture approach. In this case, we can say that each context can be composed of one or many components, communicating with each other through well-defined APIs. This approach creates clear boundaries and allows us to develop, scale, and deliver each piece separately.
A component can be anything, such as:
- an API (which can communicate with REST, GRPC, GraphQL, or any message broker)
- a cron job doing recurring tasks
- a worker listening to events to process them
- a user interface
- a library
- etc.
You can note that, in this architecture, APIs are the standard way to communicate between components and are the unique way to communicate between two contexts. This is of course a simplified representation with only one type of mapping (Open / Host Service): in real situations, bounded contexts might be mapped differently (see context mapping).
The challenges
During our DDD journey, we identified the following challenges:
- Being able to deliver continuously at a fast pace: nowadays, everyone would expect us to deliver features as fast as we speak. This is easy if you take a single service, but not anymore if you need many services which coordinate themselves.
- Keeping things simple and straightforward as they grow: as time flies and the team grows, a project can turn into a big ball of mud.
- Keeping the codebase consistent with the domain: to make it understandable by anyone who will eventually take over the project, you should aim to make your work reflect your domain.
- Communicating between components should be secure: microservice introduces the need to communicate with secure and well defined APIs and schema following good practices.
- Maintaining the team topology as the team grows: teams are fundamental means for delivery. Having a proper organisation and interactions is a key to success.
Introspecting what we had, we found out that:
- We were using a monorepo, but
- It was slow: we were linting, testing, building, and deploying every component for every single change.
- It was hard to add any new service: adding one consisted of a lot of copy-pasting, adaptation of the code, deployments, etc.
- It did not reflect our domain: the components were not structured the same as our domain and contexts were defined, making it not obvious where the separation of concerns was, and which components were supposed to belong to the same context.
- We were not Schema- nor API-first
- We did not use OpenAPI as a standard, it was more of a bonus maintained as a best-effort.
- We did not systematically expose our API for others: people were reading the code or playing with the API to test and discover it, but could not rely on the OpenAPI doc.
- We did not use OpenAPI to generate code: the SDK / client code used to communicate with the server was written by hand.
- We were using some internal core packages (home-made solutions) which helped us a lot, but some of them:
- were complex and not always maintained nor up to date.
- were not flexible enough, not allowing us to be autonomous.
- were not using the latest NodeJS features & patterns.
Monorepo as a central hub for the domain

Monorepo is a simple concept where you simply put everything under source control into a single repository. It offers de facto:
- a single source of truth
- a shared timeline
- atomic commits
And can come with:
- a simpler dependency management
- unified & shared test / build / run / deploy process
- unified & implicit CI
- etc.
If we push it further, it can be a central hub where every developer, engineer, tester, and business analyst meet and talk. In that sense, a monorepo will encourage conversations and will help us bring silos down. This is why we choose this approach: it integrates perfectly with the DDD concepts.
Nx
In theory, monorepos are great. In practice, this is another story.
Putting all projects in the same repository is not enough: you will start suffering a lot of pains such as slowness, difficulty to run or share the code or even to collaborate between team members if you are not backed up with some good tooling.
We decided to go for Nx, because of the three following reasons:
- Time-efficiency
- Tests, builds, and deploys only affected projects
- Has powerful code generators
- Consistency
- Allows code sharing
- Provides a consistent dev experience for any framework
- Comes with a workspace dependencies visualisation
- Allows automatic update to latest versions of all frameworks and tools
- Flexibility
- Comes with a rich plug-in ecosystem
- Allows to create a local custom code generator
Affected components
Nx builds a dependency graph of your components and is able to detect precisely which ones are impacted by your changes.
Let’s say you modify a given library; you will be able to test, build and deploy the applications using the library (directly or not). Indirect dependencies such as a database or API communication (i.e.: a frontend with a backend) are handled through implicit dependency which you can set up.
Being able to simply execute any commands at any time on the affected component really saves a lot of time and makes us feel very confident.
Generators
Generators are a powerful feature of Nx. You can scaffold any type of project, and do any kind of heavy operation and low-added value tasks, such as creating, renaming, or moving a component.
Custom generators are great if you have some specific needs.
In our case, we created some custom generator to scaffold the components along with the Helm chart template to deploy it easily to our Kubernetes clusters: with a single command line, anyone can generate a new service with some basic code and deployment information, and simply commit and push it to have a working application running on a Kubernetes cluster.
We created one custom generator for the APIs, the SDK, and the jobs as they present different structures and deployment strategies. This is also a game-changer as it enforces homogeneity and best practices, and reduces the time between a new idea and the moment we ship a working environment.
Visualisation tool
Being able to organise your code into folders is great, but in case you have a fine level of decoupling and a lot of interactions and shared code, it may be difficult to follow everything. You can maintain an architecture schema in some virtual board such as Whimsical / Miro / Lucidchart, which you update by hand every once in a while, or you can simply use the built-in tool provided by Nx to display your monorepo as a graph.
Simply run this command: nx dep-graph and you will get this:
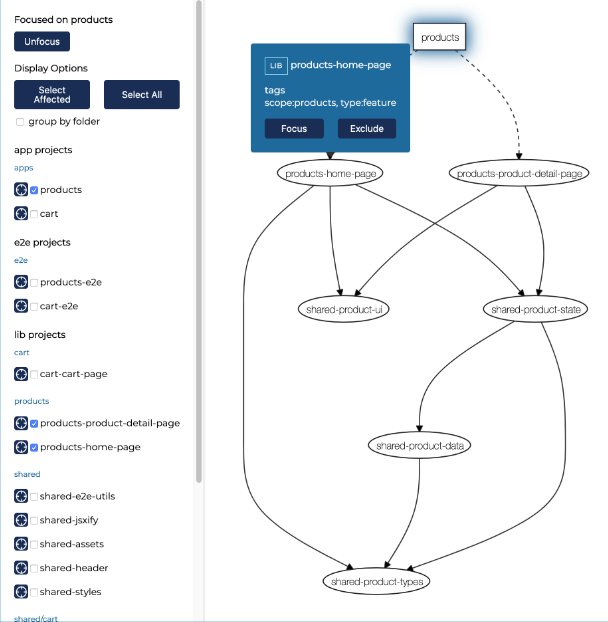
As this graph is interactive, you can play with it: select the package you want, focus on component and, my favourite one, group them by folder - context 🤩!
This is a perfect live and updated representation of your code. With this, maintaining a codebase that is consistent with your domain becomes a piece of cake!
Tests
Automated tests are a must to be able to deliver on a regular basis with safety. In our team, we use a Test-Driven Development approach: after writing down the part of the code which describes the contract, we try to start writing down some tests alongs with the implementation of the code, and do a bunch of iterations until we have our acceptance criteria all covered.
Overall, we use a testing trophy model where most of our tests are integration tests: they have the advantages of
- end to end tests: which are correlated to the acceptance criteria of our user stories (product oriented) and cover most of the layers of the code as they focus on the main outcome and not a specific function, they are less subject to change in case a refactoring is needed
- Unit tests: with a quick feedback loop as opposed to end to end tests which can take a couple of minutes to run

Static checks are done with eslint. To write unit tests and integration tests, we use Jest. To run tests only on affected components, we use this command: nx affected:test. To cover the dependencies and mock them whenever it is necessary, we rely on NestJS’ dependency injection principle (see: Turning DDD into code, below).
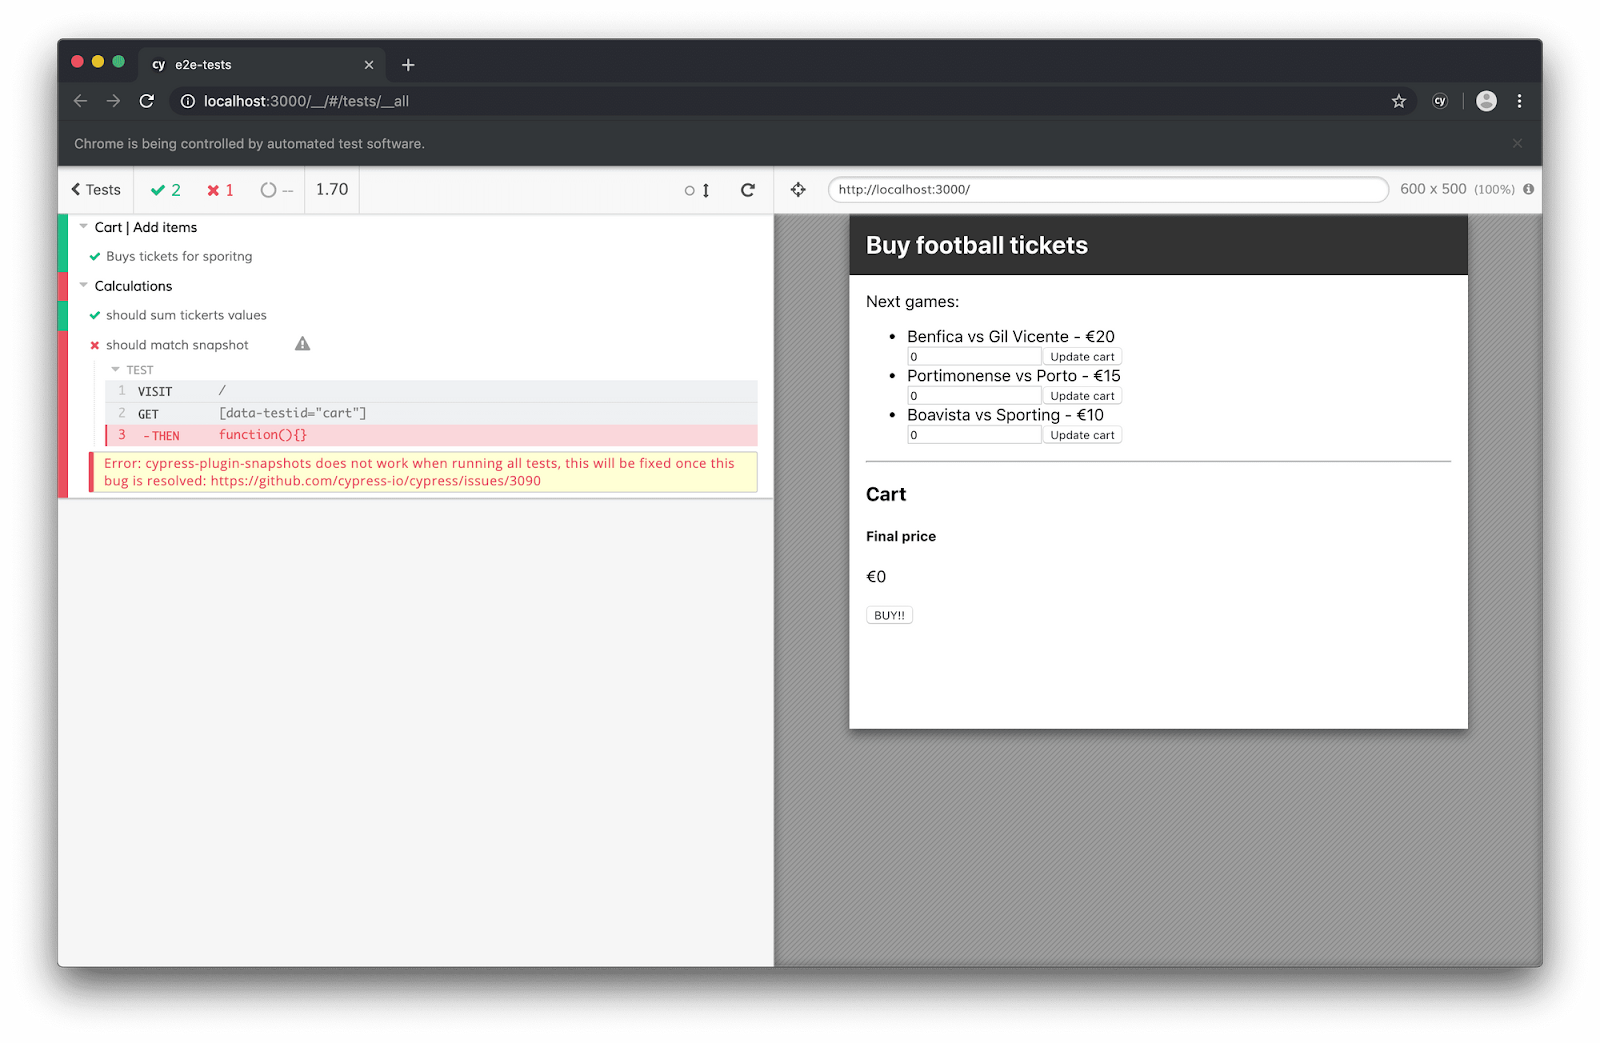
Nx also comes with a nice integration for End-to-End tests, which is based on Cypress. You can run them with a command line: nx e2e frontend-e2e .
CI/CD
The good thing about Nx and the nx affected commands is that we can simply use it on the CI settings (in our case, the CircleCI YAML file) and it will make the CI completely implicit: it eliminates the need to edit the CI workflow when we have to add a new application or a new library to publish.
Concerning the continuous deployment, we rely on ArgoCD to apply our Helm charts to the Kubernetes clusters. To simplify the process as much as possible, we decided to generate the charts at the same time that we initialise the application, thanks to the custom generators.
Extra customisation with plugins
Because each company and each team is different, with specific tools, methodology and workflow, being able to customise the monorepo is a must. NX provides some very flexible ways to do it. We started from the default and official NX setup, then checked for the available community plugin. Finally decided to create some custom workspace generators in order to be able to scaffold any future project matching our tools and standards easily with a single command line.
Turning DDD into code
Clean architecture
When we work on a given component, Tactical DDD concepts allow us to model our domain and context into entities, aggregates, value objects, events, etc. But how can we put this into practice and build a working application without mixing domain concerns with infrastructure or presentation concerns?
To achieve this, we decided to go for an architecture inspired from:
- Domain-Driven Design by Eric Evans (2004)
- Hexagonal architecture by Alistair Cockburn (2005)
- Onion architecture by Jeffrey Palermo (2008)
- Clean architecture by Robert C. Martin (2012)
Where:
- The domain layer contains exclusively our domain concerns with no dependencies to anything else
- On top of it, the application layer defines our application as use cases (in our case as commands and queries handlers). It wires up everything
- Finally, the external layers: the database (we are not database-centric) and of the presentation (HTTP routes, GraphQL resolvers, user interface etc.) or other external interfaces (external APIs)
We have a single clear dependency rule: source code dependencies can only point inwards.
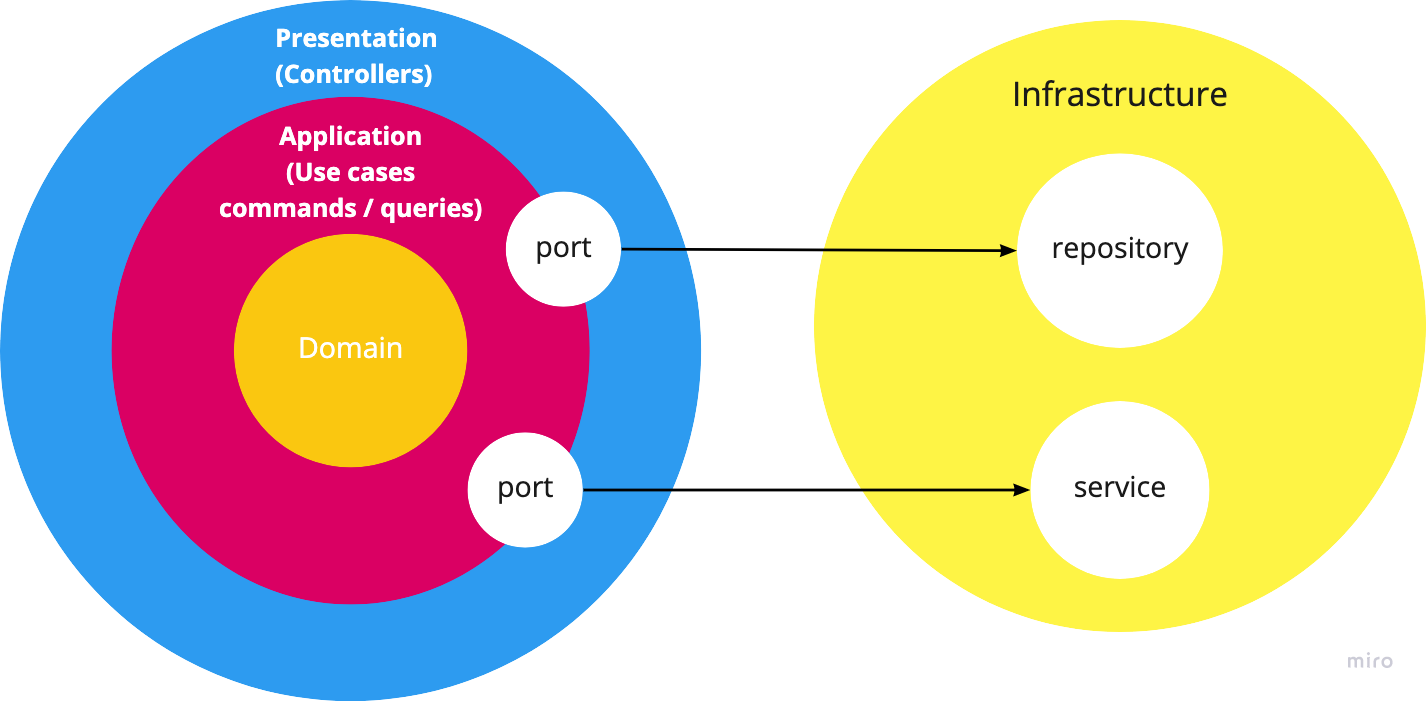
To apply those concepts, dependency injection (DI) is a key to decouple the logic for each layer and see each dependency as an interface we can inject. It offers great flexibility and a nice way to handle it compared to the manual DI we were doing.
NestJS also offers the possibility to create modules which is a flexible way to group things. We choose to create one module for each layer to enforce the decoupling and have in a single place the description and setup of each and simply import the whole module when necessary.
In our case, the Presentation layer is importing the Application layer module along with the Domain and Infrastructure module.
NestJS is playing a key role for us in allowing us to apply our clean architecture in a simple way.
NestJS
NestJS comes with 3 strong advantages:
- It is modular: everything you build can be grouped as modules: you can compose modules to build your application.
- It is versatile: you can build any kind of server application; from REST / GraphQL / GRPC API to single-use time jobs and workers which process data continuously.
- It helps you take advantage of mature architectural patterns such as dependency injection, and lets you use the latest cool features such as decorators for TypeScript to simplify your code.
Scaffold application
As mentioned earlier, we created a custom application generator to allow, with a single command line, our developers to generate a new application following the best practices defined above using NestJS. This is a great way to save time and enforce homogeneity in the whole codebase. Because we are using Kubernetes along with Helm charts to handle the Kubernetes manifests, our generator also takes care of generating the template for us with the default values.
For example, to scaffold an API called "api" in the tracking context, we can run this command: nx workspace-generator api tracking api
Decorators
A Decorator is a kind of declaration that can be attached to a class declaration, method, accessor, property, or parameter. It’s a way to tag your code to define extra behaviours, allowing you to keep your code clean and be more descriptive.
import { Controller, Get } from '@nestjs/common

@Controller({ version: '1', path: timesheet' })
export class TimesheetController {
 @Get(':id')
 @Roles(UserRoles.employee)
 @CompanyModules(CompanyModule.TICKING)
 async get(@Param('id') id: string): Promise<TimesheetDto>   {
   ...
 }
This is also a reason why we chose NestJS: it works out of the box with decorators and relies on it to work. It allows us to focus our attention on what really matters when writing code.
OpenAPI
OpenAPI, a project initiated by Swagger, is a great way to standardise your REST API. To use it, you have 2 possibilities:
- Contract First: define your API schema by hand, manually with JSON or YAML with your favourite text editor or with the OpenAPI editor and then generate as much code as possible from it.
- Code First: write your code and generate your JSON or YAML schema from it; then generate the client code to share your API - or even simply share your schema and let others generate the client code!
Whether you choose one or another, the idea is to write your schema only once.
The first mode is great if you are in a company where you use many programming languages; you will therefore be schema-driven and enforce a single way to write them.
At PayFit, we chose the second approach as we use TypeScript as our main programming language. The idea is the following: we encode the API schema information using typescript constructs (classes, types, interfaces). Our code is then processed by OpenAPI schema generation tools that parse the typescript information and extract a standard OpenAPI YAML file describing our API schema.

It allows us to avoid mistakes, save a lot of time and be more descriptive. The OpenAPI specification is used to generate client code and ensures consistent and secure communication between different components and contexts.
Finally, through our monorepo and the CI, we also share it to PayFit’ DevPortal (based on Spotify’s Backstage). It comes with Swagger UI, which provides a nice, interactive, and always up-to-date documentation that can be consulted by anyone from the company.
Generate OpenAPI schema
NestJS comes with OpenAPI decorators which allow us to tag our code manually with any OpenAPI decorator provided by NestJS. For example, we can have the following DTO command with a decorator annotation for every property:
import { ApiProperty } from '@nestjs/swagger'

export class ApplyDateCommandDto {
 @ApiProperty({ description: 'The ID of the item' })
 id: string
 @ApiProperty({ description: 'The date to apply' })
 date: Date
}
This way of doing things is very flexible, but, for our purposes, is a low-value and repetitive task. That’s why we chose to use NestJS’ Swagger CLI, from which we can get those OpenAPI decorators for free! The CLI will scan the classes, other decorators and comments to add at build time the OpenAPI decorators for you and at run-time, the specification you can share with others.
NestJS can also leverage the decorators from class-validator and class-transformer (for example the @Type decorator). While being used to generate the OpenAPI specification, they will also be used to transform the DTOs (such as converting stringified JSON date string to Date object) and validate them (mandatory fields, regular expression for string, max value for number, etc.); In this case, we are solving 3 problems at once with just one notation 🤩 !
To achieve this, all we had to do is to modify the project.json (or workspace.json) build target:
"targets": {
   "build": {
     "executor": "@nrwl/node:build",
     "outputs": ["{options.outputPath}"],
     "options": {
       ...,
       "tsPlugins": [
         {
           "name": "@nestjs/swagger/plugin",
           "options": {
             "classValidatorShim": true,
             "introspectComments": true
           }
         }
       ]
     }
   },
}
What we get in the end, is a perfectly clean code base with the bare minimum complexity. This solution feels very natural to work with and doesn't require us to duplicate things or add a lot of boilerplate. Here’s the final version of the command:
import { ApiProperty } from '@nestjs/swagger'
import { IsNotEmpty } from 'class-validator'
import { Type } from 'class-transformer'

export class ApplyDateCommandDto {
 /**
  * The ID of the item
  */
 @IsNotEmpty()
 id: string
 /**
  * The date to apply
  */
 @Type(() => Date)
 date: Date
}
At build and runtime, NestJS will automatically generate and serve the OpenAPI schema for us, by turning any controller’s method to an operation with its path and verb and any DTO to a component. The next step is to start using the schema!
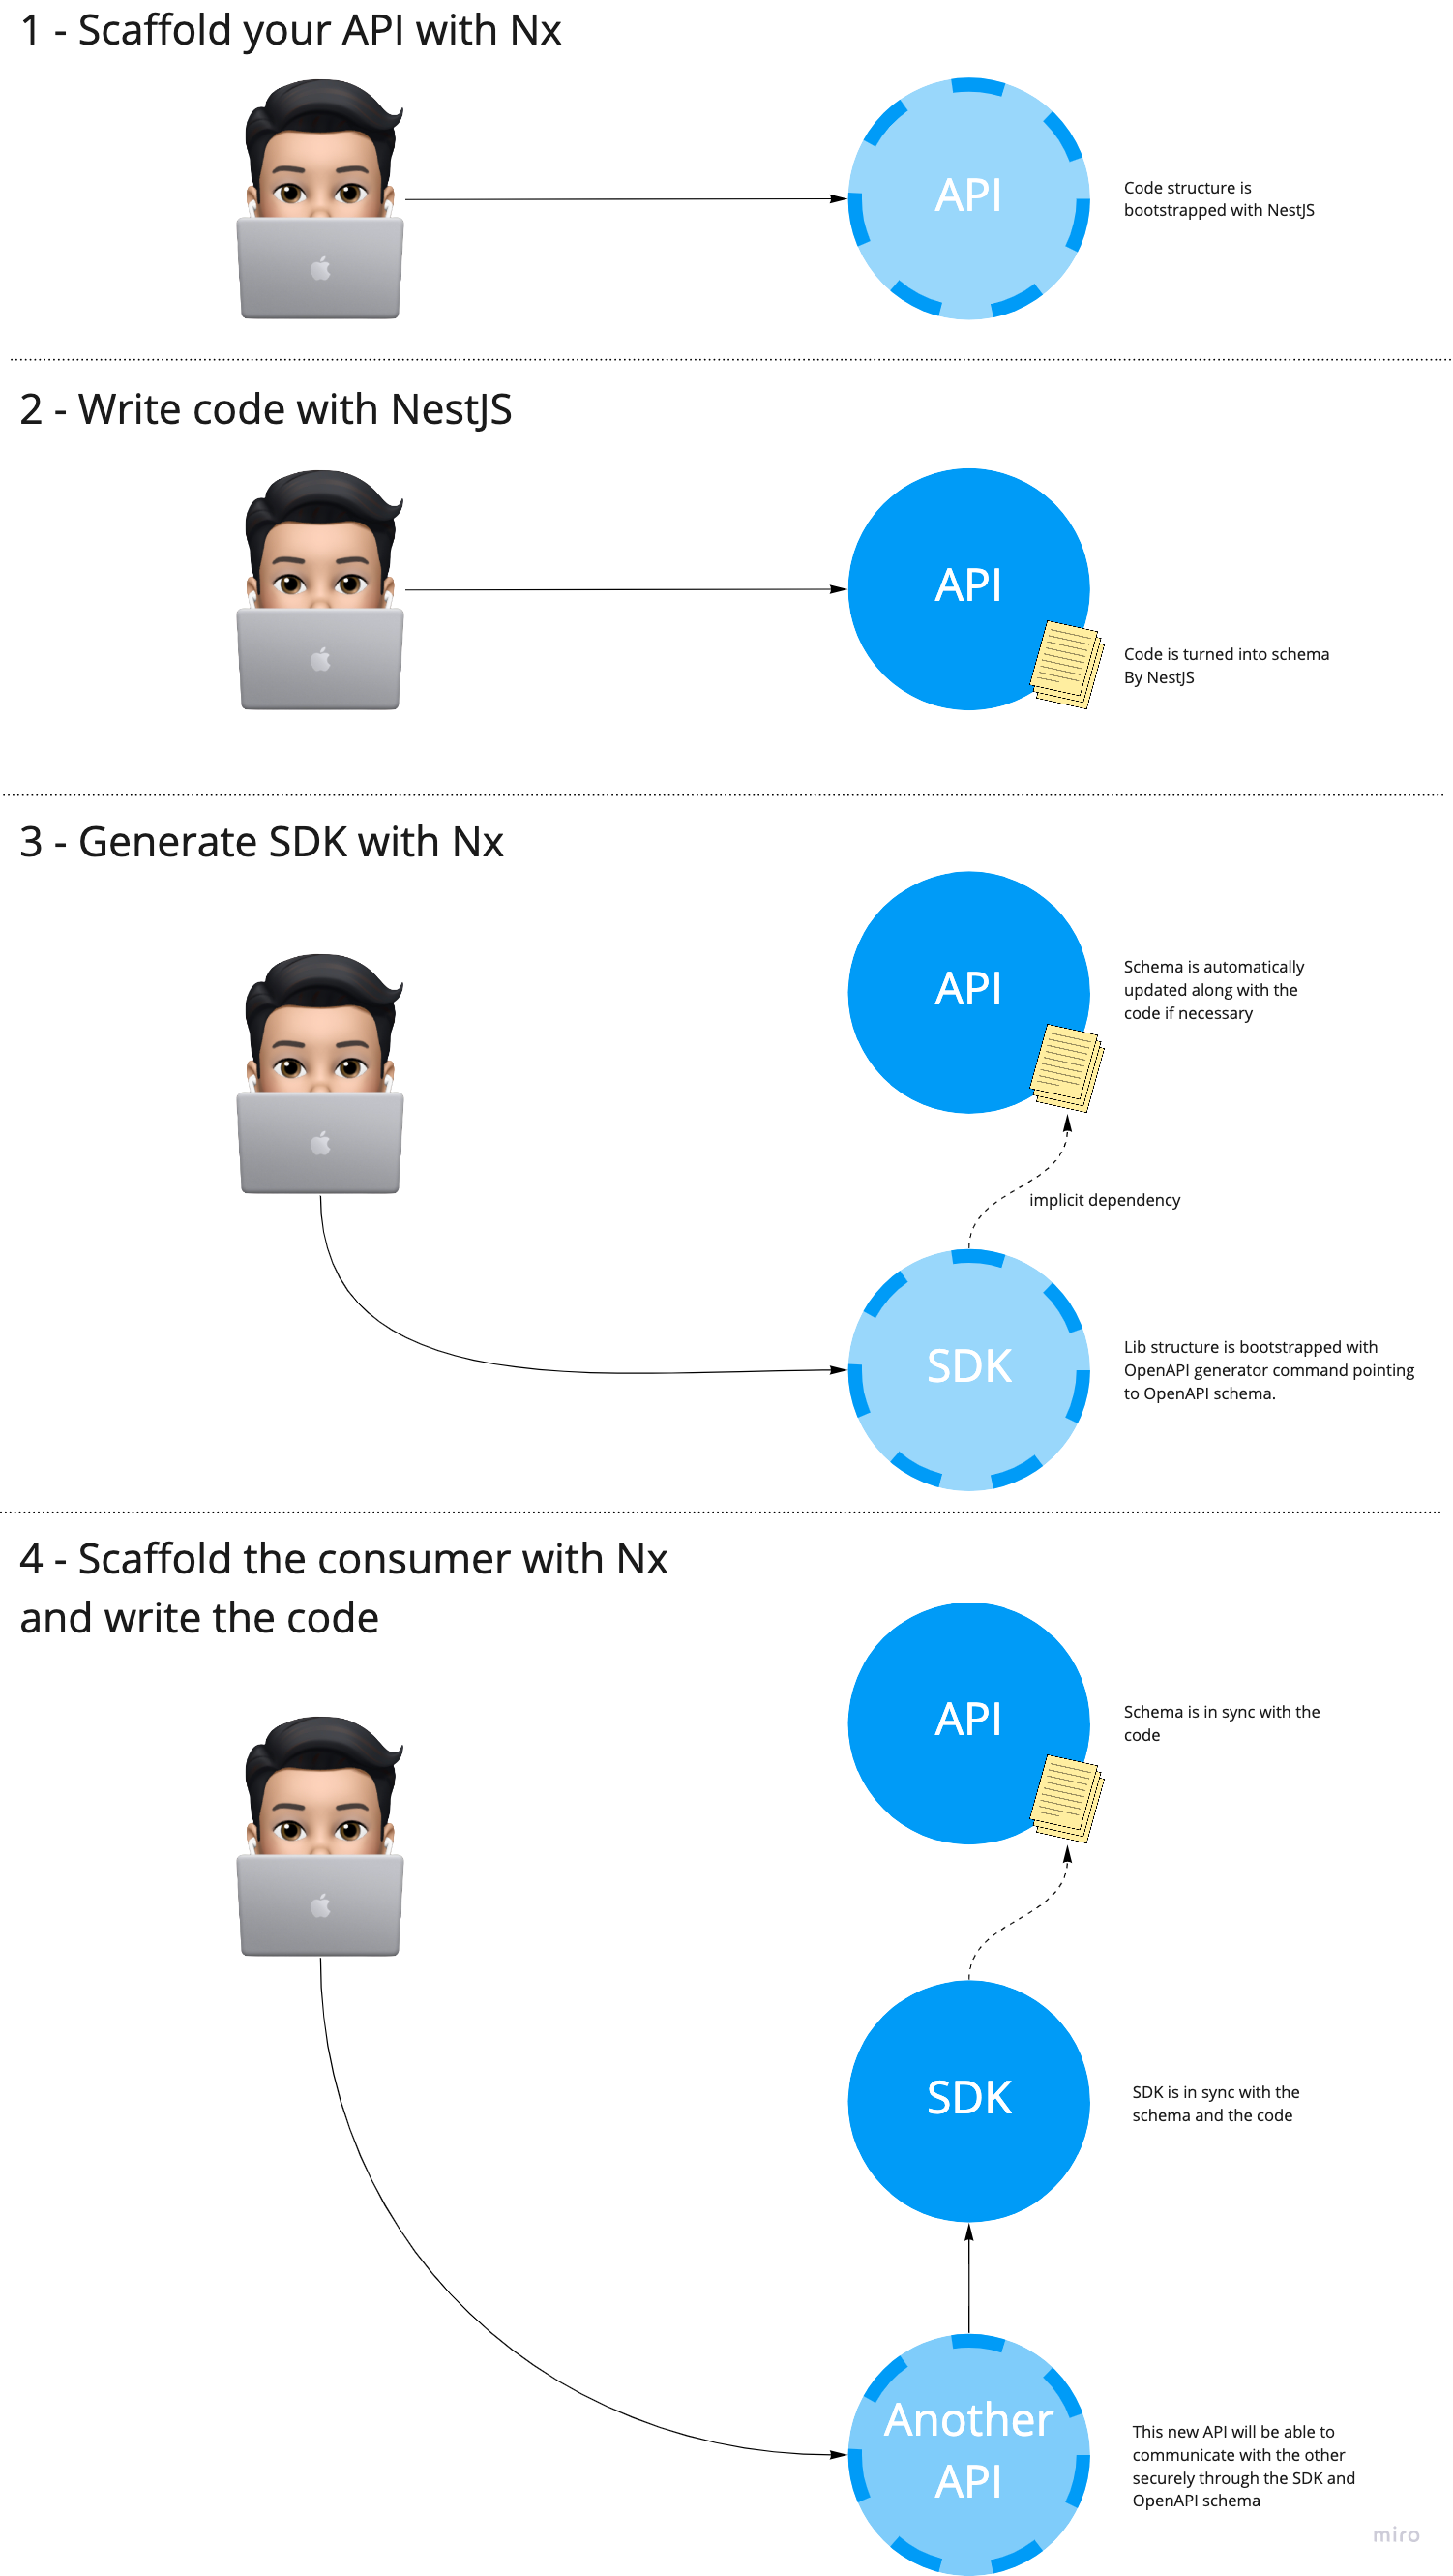
Using OpenAPI schema to generate an SDK
Having an OpenAPI schema provides many benefits. For example, you can use it to generate an SDK in order to ease and secure the consumption of the given API. It will be in charge of creating the HTTP client, executing the requests, serialising the inputs and deserializing the outputs. The SDK will also take care of the HTTP client configuration (timeout, url…) and of exposing the available resourcetypes so that they can be consumed while taking advantage of typescript’s type safety.
Being able to automatically generate SDK’s after every server-side modification is a must to avoid wasting time doing manual and error-prone actions.
In our case, we choose to generate them as Nx libraries to make our SDK’s standalone and shareable. With the concept of implicit dependencies we can take advantage of the nx affected command for any operation (test, build, deploy, etc.) even with this kind of indirect dependency (REST API calls).
{
  "root": "libs/my-api-sdk/",
  "sourceRoot": "libs/my-api-sdk/src",
  "projectType": "library",
  "targets": {},
  "implicitDependencies": ["my-api"]
}
To put it into action, we created a new workspace generator to allow anyone to create an SDK library for a given API. We made sure this generated SDK comes with the following “generate” target:
  "generate": {
    "executor": "@nrwl/workspace:run-commands",
    "options": {
      "commands": [
        "docker run --rm -v \"${PWD}:/local\" openapitools/openapi-generator-cli generate -i /local/apps/our-context/our-api/open-api.yaml -g typescript-fetch -o /local/libs/our-context/our-api-sdk/src",
        "yarn prettier ./libs/tracking/api-sdk/** --write"
      ],
      "parallel": false
    }
  }
For the Nx target, we use the OpenAPI Generator. It works great with lots of available templates to generate client code in any programming language and is highly customizable.
You can note that we are using a docker run to execute the automatic schema generation to avoid having to install anything extra on our computer.
To sum up the whole process
Extending to GraphQL
At PayFit, we also use GraphQL for server-to-server or client-to-server communication. In this case, as a consumer, we choose to apply the exact same logic with this code generator which is run against an existing schema. Unlike OpenAPI we decided to put the SDK directly in the component where we need to use it and to write and generate strictly the required queries. Since GraphQL is a general query mechanism, the space of possible valid queries is infinite, so using the same approach as we used with OpenAPI would not have been the most appropriate.
To use it, we had to:
- Create a YAML file to define the schema url, the queries to parse and the plugins to apply
schema: https://our-graphql-server
documents: "apps/our-context/our-component/src/**/*.graphql"
generates:
 apps/our-context/our-component/src/graphql/generated.ts:
   plugins:
     - typescript
     - typescript-operations
     - typescript-graphql-apollo
- Define the queries we wanted to use in one or many *.graphql files
query GetEmployeesFullName($ids: [ObjectId!]!) {
 findEmployees(where: { id: { IN: $ids } }) {
   id
   variables {
     fullName
   }
 }
}
- Create an Nx target
  "generate-graphql": {
     "executor": "@nrwl/workspace:run-commands",
     "options": {
       "commands": ["yarn graphql-codegen --config apps/our-context/our-component/codegen.yaml"],
       "parallel": false
     }
   },
With those 3 modifications, as the queries are checked over the GraphQL server schema and the code generated from the queries is 100% TypeScript, we now have an entirely type-safe way to consume the generated code to communicate with the server.
The fact that everything works out of the box with a small config file and command line feels like magic! This extensible plugin approach offers an infinite number of possibilities.
Our experience so far
From Yarn to Nx workspace
For us, compared to other similar monorepo tools, Nx is highly customizable and comes with a set of complete features.
Going from Yarn workspaces to NX was straightforward thanks to the tutorials provided by the Nx document page.
We decided to split the workspaces into many JSON files: one per application and library to make it more straightforward to maintain. Making NX work with our actual CI/CD asked us to do some research and to try some options, but overall, we managed to have something working thanks to this orb and some of the nx affected command where you can specify a target option to lint, test, build, build-image, and push-image the components affected by the commits.
Workspace generators are great: you can mix templating and code logic to create/update files and folders and adapt them to your needs. Writing a generator was a simple task as Nx comes with many examples and documentation.
Being able to scaffold any new project and simply commit, push it with a few command lines is a killer feature. In 10 mins we can go from nothing to a deployed and working app in our Kubernetes cluster!
The interactive dependency graph visualizer is nice to understand your repository and see the dependencies, and to explain it to others. It acts as a live diagram always up to date with your architecture!
The project.json file
At first glance, the project.json file for each component seems very complex but once we got used to it, we realised how flexible and powerful it was compared to the default scripts commands from the package.json file. The fact that targets work naturally out of the box with the nx affected command makes it really powerful on a daily basis.
From DDD workshops into code
The flexibility of the entire Nx + NestJs + Code generation tools works really great in allowing us to apply both strategic and tactical DDD concepts while using microservices with TypeScript.
Next steps
Of course, at the time of writing this article, we are far from done and there are still a lot of things we would like to improve and introduce; for example:
- Add semantic versioning to automatically handle app and library versioning, changelog and use version as docker tag instead of commit sha1
- Add frontend app generator and make it compatible with micro-front end
- Add other communication strategies (GRPC, message broker, etc.)
- Define security best practices
- Refine e2e tests experience with BDD (with Cucumber.js)
- …
DDD is a continuous and long process
The more you explore DDD, the more you discover that it’s more complex than you initially thought. DDD is indeed a long learning process you have to keep doing with your team and the experts. It’s not only a matter of using the right tools but also of having the right process in which you encourage communication, take the time to define, clarify and refine your domain continuously as time passes.
Takeaway
Build a shared knowledge and make your code reflect it 🙆🏻♂️
Having a monorepo is a good option to have a central hub where you can put all of your DDD artefacts. You can make the monorepo structure reflect your domain with the bounded contexts. In our case, monorepo is not about technology but about work culture and communication. We use it because it brings visibility, consistency and efficiency to the whole team and product
Write it once 🖋
Enforce communication between components with schema. Be code- or schema-first, but do not do both. Use auto-generated client SDK to communicate with any other component outside your context.
Automate all human, non-added-value tasks 🤖
Because your time is precious and because you can avoid stupid mistakes. You can easily rely on code generators to scaffold or generate your applications, deployments and your SDKs.
Build an ecosystem where everything works & plays together 🚀
We now use many tools: Nx, NestJS, typescript, OpenAPI, the OpenAPI / GraphQL code generators, Jest, Helm Chart, etc. Combining them all feels very natural. We can even say that each of them is empowering the others: they all contribute to one goal.
As a final word, I would say we should never forget our first mission: build amazing software to delight our customers. We should remove any constraints and anything that distracts us from this goal.


